Sunday, 8 March 2020

LinnaCruising 2019 - 10th of August - HĂ€meenlinna, Finland - Part 2/2 - Muscle cars

Here's second part of photos from LinnaCruising held last summer in event park of Kantola in HĂ€meenlinna 😊

Chevrolet Camaro SS Convertible

Tuesday, 3 March 2020

'73 Suzuki GT250 - Part 12 - Mock-up engine

Some time ago I bought a cheap Suzuki GT250 parts bike from an online auction site. Bike itself was in pretty bad condition but I taught I could utilize at least some parts from it. Lots of parts were missing but frame had still front forks, swingarm, fuel tank and engine attached to it. Few extra pieces, like Honda CB125 exhaust pipes, which I sold, were included to the deal as well. After disassembling parts from the frame I turned my attention to the engine. It wasn't a big surprise that it had seized pistons and plenty of rust after sitting outside and water getting in. After taking the engine a part I decided to clean it up a bit and utilize it as a mock-up engine for building exhaust pipes et cetera while I put together actual engine for this bike.

Suzuki GT250 engine out of a spare parts bike


I decided to use soda to clean upper and lower crankcase. Good thing about soda blasting is that it isn't abrasive like sand blasting so it doesn't require as much prep work since you don't have to mask as many spots. Bad thing about it is that it's rather corrosive if parts are not cleaned well afterwards.

Before blasting I used a brush and some solvent like brake cleaner to remove excess dirt and grease which would have just ended up disturbing soda blasting process. Below you can see few closeups of lower crankcase before and after soda blasting. I soaked them in warm water after blasting to get leftover soda out of them. Otherwise it would have ended up corroding the surface.

Lower crankcase before soda blasting


Soda blasting equipment: 
gun, water separator for air compressor and soda


I put both crankcases to a big bucket with warm water
after soda blasting to dissolve leftover soda out of them

Lower crankcase after soda blasting


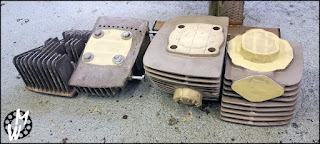
For cleaning cylinders and cylinder heads I decided to use sand blasting. Before doing so I took rubber pieces out between cylinder head fins, removed excess dirt with a brush and some degreaser and masked surfaces which I didn't want to get blasted. I did this at my university's workshop where they have a sand blasting cabinet. I will show it in a post coming up later.

Cylinders and heads prepped for sand blasting

Closeup of sand blasted cylinders and heads
Last step was to bolt covers back on the crankcase which I bought separately. I used socket cap screws for nice aesthetic which I had in stock. I didn't see it necessary to clean up covers yet in this phase since they looked to be in OK condition.

Pieces of mock-up engine


Crankcase covers

Various M6 & M8 socket cap screws

Mock-up engine ready


I will take this engine apart and fit in necessary axles when I will start to figure out how to fabricate brake and gear levers. But before that I need footpegs which are next on my list of things to finish. If you look close at one of pics below you might find an easter egg related to them 😎

Wednesday, 19 February 2020

The Kustom Kulture Show 2020 @ Cable Factory - 9th of February - Helsinki, Finland

This year's Kustom Kulture Show once again displayed lots of cool kustom cars and motorcycles. In addition there were various type of artists and craftsmen such as painters and tattoo artists. Event kicked off on Saturday which ended to a party with bands playing live music and performances such as Burleski and sword dancing. I made my visit during Sunday morning knowing it would be a squeeze to fit in later and hoping there would be more space for photographing. Check out how the event looked 😎

1952 Buick @mast_auto

Sunday, 2 February 2020

Petrol Circus Custom Bike Show @ MP 20 Motorcycle Expo - 1st of February 2020 - Helsinki, Finland

Check out photos from this year's Petrol Circus Custom Bike Show which was held parallel with MP20 motorcycle show at Expo and Convention Center of Helsinki. Show gathered together around 100 custom motorcycles to compete in four classes: Custom, Street, Classic and Open. 

My personal favourites were Kawasaki powered Sulo Chopper, Kalevala themed Harley-Davidson PanShovel Indian Larry Tribute, brat style/tracker Honda CB400N, 1980 Suzuki GSX750 cafe racer, Suzuki GSX-R 1340 street fighter, 2-stroke Suzuki RGV250 and 184cc Honda Monkey Turbo 😎

Royal Chopper 'Prince of India' @woodlegchoppers

Monday, 27 January 2020

Hanaa Expo 2019 - 28th of November - Lahti, Finland

Last November I went to check to out second annual Hanaa Expo, a Motorsport trade fair, held in convention center of Lahti. In addition to wide range of Motorsport vehicles and teams, which I mainly wanted to see, there were vast group of different vendors and event organizers as exhibitors. Interviews and discussions related to different forms of motorsports from rally to drifting were held in the stage right across the entrance. Check out how it looked 😎

Renault 5 Turbo Group B

Wednesday, 22 January 2020

'91 Honda CBR600F PC25 - Part 4 - Custom brackets for round headlight

I've had a 8 inch round headlight lying around which I bought originally for my '87 Yamaha RD350LC F2 project but never got time to install it before selling the bike. I had headlight also for sale for a while after that but no one was interested to buy it so it just stayed untouched in my shelf waiting for another suitable project.

8 inch round headlight

Regarding this build I haven't decided any specific style go with but I wanted test how a round headlight would look in front of my CBR600F. It was also good time to do that while I have front fairings removed. I've made earlier similar type of brackets for '72 Suzuki T250J and used them as a reference for these ones too. I made subtle changes and updated dimensions to suite better '99 Honda CBR900RR SC33 front forks I swapped last time. I still need to design and fabricate a stopper for the headlight to keep it from tilting while driving. I'm not 100 percent sure how to make it yet so it will have to wait for the future. There's also things like what kind of gauges I will use to think about.

Assembly drawing

Layout drawing with main dimensions

After making part drawings for collars and plates it didn't take much effort to start fabricating them out of sheets of stainless steel. It's not the easiest material to work with since it tends to wear out drill bits and warp easily with heat. I didn't end up using many power tools other than electric drill and Dremel this occasion so it took a bit longer to finish them. Quickest way of course would have been to get them cut with laser or water jet cutter.

Part drawing for collars

I cut out blanks for collars with a plate shear
and then marked holes and rounds to corners

I started by drilling holes...

... and then rounded all corners with a file and sanding block

I used an affordable sheet metal bending machine
to bend edges of collars and rest by hand against forks

I finished outer surfaces of collars with a scotch brite wheel

Part drawing for plates

Sketched outlines of plates with pencil
and used washers as templates for round corners...

I started by drilling holes,..

...then cut both plates out with a hand saw
and finished edges with file and sander

I used a vise brake for bending...

...and checked angle of bends with digital angle finder

Last step was to clean plates with scotch brite wheel

Parts for headlight brackets

Headlight installed

Monday, 9 December 2019

Malmi Street Drags #3 @ Helsinki-Malmi Airport - 3th of August 2019 - Helsinki, Finland

Here's a photo set from 3rd Malmi Street Drags event held this summer in Helsinki-Malmi Airport. Warm day gathered a lot people to spectate how hobbyist cars and motorcycles competed against each other on the 1/4 mile drag strip of Malmi-Helsinki Airport in two classes, Street and Vintage. Big parking lot next to the strip worked as a hobbyist car park and gathered many lots of cool classic and custom cars. Check out also my photos from Malmi Street Drags #1 😊

Plymouth Belvedere A-FX

Monday, 4 November 2019

'73 Suzuki GT250 - Part 11 - GT550 front fork swap - 1/2 - Rebuilding front shock absorbers

Some of you might remember me purchasing a set of Suzuki GT550 front forks quite a long time ago. At the time I wasn't sure what to do with them until I got my GT250K project going. First I was thinking of rebuilding GT250 forks for this project but the set I have was in worse condition than these ones. Good thing about these are that they are more rigid than GT250 front forks. Main difference is that stanchions have 35 mm diameter compared to 32 mm ones in GT250. Otherwise main dimensions like spindle diameter and steering bearings are the same so it's easy to swap them. I will feature triple trees and mock up more detailed on next part. This part will cover rebuild process of front shocks.

Suzuki GT550
front forks
Below is a picture of steps how to assembly Suzuki GT250 & GT550 front shocks (left to right). Same process applies also for disassembly but from right to left. I disassembled my forks long time ago I didn't unfortunately take pictures of that process.

Steps of assembling GT550 front shock absorbers
Upper parts of old stanchions were very pitted and rusty most likely due to moisture accumulating inside headlight brackets. Since I wasn't going to use original headlight brackets and wanted to leave them exposed I went ahead and bought myself a new pair of stanchions from eBay instead trying to do anything with the old ones. I cleaned sliders and circlips, which attach to bottom of the stanchions, and installed them to the new ones.

New stanchions for Suzuki GT550 front forks

Unboxed

Comparison of new and old stanchion


Sliders and circlips in order
I decided to shave off ears from outer tubes which the stock front fender attaches to since I didn't have any use off them anymore. I started by cleaning outer surfaces of them with soda blasting gun. After that I removed most of material with a saw and an angle grinder. Since there were still a lot of excess material to be removed I used a file next. I tried to be careful and not remove too much or making too deep scratches while filing so I marked a spot with a red marker pen to indicate when to stop and move on to sanding. I used normal sand paper for rough and wet sand paper for finer sanding. Last step was to polish them with buffing wheel and polishing paste. I purchased new hardware for inner tubes and axle holders and screwed them back on.

Outer surface of outer tubes cleaned with soda blasting

Ear sawed off

I marked an area which I wanted to file flat
with a red marker pen

After rough sanding...

...and finer wet sanding

Buffing wheels and Autosol polishing paste

Outer tubes and axle holders after polishing

New M8x27 hexagon socket head screws
with low head (#51147-48130) and copper washers

Rebuilding outer tubes

Non-serrated M8 flanged nyloc nuts DIN 6926 for axle holders
After getting stanchions and outer tubes back together it was time to mate them together. I started by sliding the rebuild stanchion inside the outer tube. Before installing a new oil seal I made sure that the upper slider was inside the outer tube. Otherwise it would have been a nightmare to get the oil seal out to get it back inside. For this project I chose fork seals made by Pyramid Parts (#FOS 013) just like I did with my CBR600F. After knocking oil seal in place I put on a washer on top of it and installed circlip with circlip pliers.

Pyramid Parts fork oil seals #FOS 013

Box comes with a pair of 35x48x11 mm oil seals,
seal buddy tool, lubricate and a sticker

Slider, oil seal, washer and circlip

...and order how to put them back together

Circlip installed with circlip pliers 
Last step was to install new fork dust seals, slide in springs, add fork oil and screw on caps to top of stanchions. Since these forks originally had boots instead of dust seals I wasn't sure if I was able to find a suitable pair for them. I ended up ordering a set of Pyramid Parts fork dust seals (#DB10) which seemed to work decently well with them. I got myself a one liter bottle of 15W Motul fork oil and measured 2.35 deciliters for each shock. Caps were little bit pitted as well so I took a small piece of aluminum foil and brushed rusty spots with it under a running water. That's an easy trick to get rid off small rusty spots from old steel parts which are chrome plated. Off course it's not a permanent fix but a lot cheaper than new parts or chrome plating. I replaced old O-rings with new ones (#51181-31030) before screwing them back on.

Outer tube dimensions

Pyramid Parts fork dust seals #DB10

Springs, caps and set of dust seals

Fork inner tube caps and O-rings (#51181-31030)

Motul SAE 15W Expert Medium Heavy fork oil (#101138)

Measured roughly 2.35 decilitres of fork oil
for each shock

Rebuild Suzuki GT550 front shocks
Check out also part 2 where I complete this swap after refurbishing top and bottom yokes and fitting it to my GT250K 😎