Monday 9 November 2015

Bates style headlight and custom stainless steel brackets - Suzuki T250J

I wanted a small side mounted headlight for my T250J. It had to be E-marked. I found a suitable one from ebay and ended up buying some rubber inserts with it. The headlight is approximately 155 mm wide with spacers and 110 mm deep without glass. I found some relatively small indicators from my local motorcycle parts store.

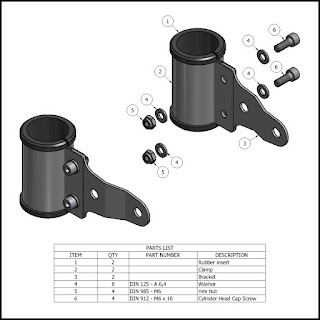
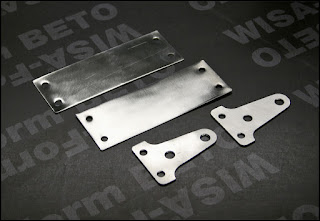
I made some custom brackets out of stainless steel sheet. I started by creating few prototypes with a modeling software. After a few models I ended up with a simple one seen in the pictures below. 

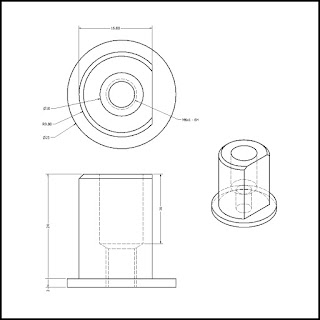
Rubber inserts were a bit too big so I shortened them with a knife. I also switch the stock headlight screws to stainless steel cylinder head cap screws which I had to order from ebay since I couldn't find them from my local shops nearby.


5 3/4" Bates style side mount headlight
41 mm rubber inserts for headlight brackets/mounts
Dice Winker Mini Arrow black indicators
Assembly and parts list
Dimensions for clamps
Dimensions for brackets
Cut and drilled blanks
Bend parts with shortened rubber inserts
5/16" UNF A2 stainless steel cylinder head cap screws with
stock headlight screws
Closeup

Sunday 13 September 2015

Red LED taillight underneath the seat - Suzuki T250J

I purchased a red LED taillight a while ago from ebay. Taillight came with two M4x40 screws, washers and nuts. I had a clear one in my Kawasaki KDX 125 back in the day.

I was going buy a Bates style taillight and mount it to the rear fender but decided to go with this one since they seem to be quite popular these days and I wanted something different. I decided to mount it between the rear fender and seat.

Red LED taillight from ebay.
Back side.
I started by disassembling the seat. Seat cover was attached with a strip to the seat pan. Strip was easy to remove by simply pulling it although you had to be careful not to tear the seat cover with the clips in the strip. 

Disassembled Suzuki GT 250 seat.
Once I removed the foam off the seat pan I drilled two 11 mm holes to the rear end of it. I then welded two hex weld nuts around them with my MAG welder.


I ground the hex weld nuts flat before welding them.
I fastened the weld nut with a screw to keep it in position
while welding. Lip helped with the positioning.
Hex weld nuts welded in place.
Next step was to make a suitable bracket for the taillight. I decided to use 2 mm stainless steel sheet as a material. I used two M8x16 socket head cap screws to mount the bracket underneath the seat. I replaced the two M4x40 screws which came with the taillight since they were a bit too long with two M4x35 socket head cap screws.

Stainless steel brackets and fasteners.
Measurements for the taillight bracket.
Test fitting.
Done.

Tuesday 8 September 2015

Brat style rear fender - Suzuki T250J

I wanted to make a small and simple brat style rear fender for my T250J. The bike came with a shortened front fender which was in a good enough condition to use as blank.

Suzuki T250J front fender.
I started by drilling out all small rivets which hold the two pieces of the fender together. I also made the rivet holes bigger by drilling them. I decided to use M6 screws so I used a 6,5 mm drill bit. I then traced an arc to the fender with a paperboard template.

A paperboard template helped to trace an arc to the fender.
I used a battery-powered angle grinder made by Makita with 1 mm thick cutting disc to cut the arc. Once that was done I removed burrs with a sanding machine.

Cut fender, a battery-powered Makita angle grinder
and a sanding machine.
Next step was to make proper brackets to hold the fender in place. I decided to use 2 mm aluminium sheet as a material. I used M6x16 socket head cap screws, washers and M6 nyloc nuts to hold the brackets on the fender. Two M8x45 hexagon head screws hold the upper brackets and a M8x20 the right lower bracket on the frame.

Upper and lower brackets and fasteners made out of
2 mm aluminium sheet.
Measurements for upper brackets.
Measurements for right lower bracket.
Brat style fender ready to be mounted to my T250J.


The bike came with an unused Michelin 3.25-18 59S M45 E2 tire so I decided to use one as a front tire also. I bought a Michelin 3.00-18 52S M45 E2 tire from my local motorcycle parts dealer Euro Motor Center. 

Old tires were in a pretty bad condition. Front tire was a factory installed Inoue 3.00-18. Rear tire was a pain in the ass to remove as it was dried and cracked and wouldn't like to bend over the rim. Motion Pro tire irons helped a lot to remove those tires.

Michelin 3.00-18 52S M45 E2 front tyre and 3.25-18 59S rear tyre

Side view with new tyres and fenders.

Thursday 27 August 2015

Controls, steering damper and gauges - Suzuki T250J

It has been a while since my last update. I started a new job in June and I've been working long hours since then sometimes even on weekends. Not much has happened since May but I have been working on getting the exterior of my bike finished.

I have been planning on getting a pair of bar end mirrors in the future so I purchased a couple of new Domino Dakar grips which have open ends. I also refurbished throttle assembly, clutch and brake levers. I bought new cable adjusters for both levers and a new front brake light switch from ebay. I also replaced old bolts with new hexagon socket head cap screws.

Domino Dakar grips with open ends.

Refurbished levers and throttle assembly.

I managed to find some steering damper parts from a local swap meet in June. Unfortunately knob (51730-08100) was broken so I had to find another. I managed to order one from ebay which didn't include a rod. I wasn't able to make one myself so I contacted a small Finnish metal industry company called Kymen Koneenrakennus Oy (http://www.kymenko.fi/index.html) to help me out. I made a simple drawing of the rod and got it in a couple of days. I also modeled some of the steering damper parts just for fun and made simple drawings of them if someone needs them. 

Steering damper parts.

Bottom of steering damper assembled.

Drawing of steering damper's knob's rod.

Drawing of hub, damper sleeve (51741-08100).

Drawing of bolt, damper lock (51781-08100).

I made a new bracket for speedometer and tachometer out of 2 mm stainless steel sheet. I used the old bracket as a template. I wanted to have the gauges closer together so I made it a bit narrower than the original. I used a bending brake to bend it and I finished the surface with a nylon wire brush to get a nice brushed look.

Drawing of bracket which holds speedometer and tachometer.

Cut and drilled blank for gauge bracket.

Bend part and a vise operated bending brake.

I used a nylon wire brush to polish the bracket.

Bracket in place.

Overall view of controls, steering damper and gauges.

Monday 25 May 2015

Billet clip-ons and top yoke - Suzuki T250J

I wanted to create something to my bike with abrasive water jet cutter that we have at our university. I had already machined a billet out of recycled aluminum which was perfect for a top yoke. Size of the billet was 200 x 200 x 23 mm. 

I had previously purchased a pair of billet clip-ons from ebay which I used for an inspiration when I started to design the top yoke. Handlebars sit in a 10 degree angle and they are made out of 22 x 380 mm aluminum tube. Inner diameter of the tube is 16 mm.

Pair of clip-ons I bought from ebay which are meant for 
34 mm tubes. Outside diameter of clamp is 49 mm.
I wanted to implement features from the clip-ons to the design so I designed four symmetrical triangle shaped holes which follow outlines of the top yoke. I also wanted the outside diameter (49 mm) to match.

I used two different softwares to create necessary tool path for the abrasive water jet cutter. Basic outline of the top yoke was designed with CATIA V5. I used CATIA's part design workbench to create a 3D model which I then moved to drafting workbench to create a DXF file. Tool path and DNC file was created with IGEMS.

3D-model of the top yoke without machined features.
Preview of the DXF file.
Last step was to machine all the necessary features with a vertical milling machine and finish the outside surface with flap wheel with shank. I used a round ceramic grinding stick with shank to smooth the triangle shaped holes. I felt that polishing would have taken too much time so I used a finishing pad like Mirlon to get a brushed look.

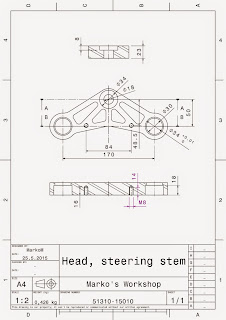
Workshop drawing.
Top view.
Bottom view.