Tuesday, 27 September 2016

Yamaha RD 350 F2 '88 - Part 6 - New rear wheel bearings, seals, X-ring chain and sprockets

While maintaining rear linkage for my RD350 I went and replaced worn out sprockets and chain. The old chain had strained quite a lot during its life time and it was already tightened to its max position. One option would have been to just shorten it but since the old rear sprocket was also in pretty bad condition I decided it was best to just replace all those parts. 

I ended up choosing sprockets made by JT Sprockets and a X-ring chain made by D.I.D. I went with 17 tooth front and 39 tooth rear sprockets. Since the chain needed to be riveted I had to buy a chain breaking and riveting tool also made by D.I.D. There were two types of tools for sale. I bought the cheaper one, which had "02-99" stamped on the side of it. While riveting the chain I found the lower jaw of the tool bending and had to make a cotter out of flat bar to stop it.

I also decided to replace rear wheel bearings while I had the rear wheel out of the bike. I bought a kit which also included right sized oil seal (22 x 42 x 7 mm). I used a gas torch to heat up and expand both bearing hubs in the rear wheel to get the old bearings out and to install the new ones. Depending on the condition (rusty) of the bearings you might need give them a small knock. If you have painted your wheels you might need to use another solution. If you don't have proper tools for the job, there's a lot of shops, which can do it for you. 

Unfortunately I forgot to buy a new bearing (6304) for the sprocket carrier and since it was Sunday and all the shops were closed when I was doing all of this in a hurry to get the bike finished I just ended up greasing the old bearing and replacing worn oil seal with a new one (32 x 52 x 7 mm).

To sum all up here's a list of all parts needed for the job:

-Tourmax rear wheel bearing and seal kit (MCI-WBK-055) 
 or two 6302 bearings (15 x 42 x 13 mm) and oil seal (22 x 42 x 7 mm)
-Oil seal for sprocket carrier (32 x 52 x 7 mm)
-6304 bearing for sprocket carrier (20 x 52 x 15 mm)
-JT Sprockets 17 tooth front sprocket (JTF569.17)
-JT Sprockets 39 tooth rear sprocket (JTR846.39)
-D.I.D 520 VX2 X-ring chain with 106 links
-D.I.D chain breaking and riveting tool (02-99)

There's also one O-ring (93210-40530) in the rear wheel you might need to replace. Since mine was in good condition I just ended up greasing it.

Tourmax rear wheel bearing and seal kit (MCI-WBK-055)
and collar (90387-154A0).

Rear wheel (black) and sprocket carrier (blue) oil seals

Front and rear JT sprockets and D.I.D 520 VX2 X-ring chain.

D.I.D chain breaking and riveting tool.

Parts of the tool... 
...and instructions for it.

Cotter kept lower jaw from bending.

Bearings and other hardware removed...

...and new parts installed.

New rear sprocket and oil seal installed.

X-ring chain riveted and tightened.

Tuesday, 13 September 2016

Hifi & Tuning Show Oulu September 2016 - Euro cars

Here's the last photos from the event covering Euro cars.

Audi A3 Sedan

Monday, 12 September 2016

Hifi & Tuning Show Oulu September 2016 - American cars

American cars were also a minority this year. Here's few photos of the ones exhibited at the event.

1930 Chevrolet Hot Rod

Hifi & Tuning Show Oulu September 2016 - Motorcycles

Here's couple of photos of motorcycles displayed at the event.

1998 Honda CB1300 X4 Turbo

Sunday, 11 September 2016

Hifi & Tuning Show Oulu September 2016 - Japanese import cars

Today I attended one of our local trade fairs called Hifi & Tuning Show held in Ouluhalli, Oulu. It is an annual event meant mainly for modified cars. First time the event was held in early 2000s. You can find more info of the event from their facebook page.

I wanted to test out a new camera, Sony DSC-HX90V, so I took quite a lot of photos during my stay. I will make separate posts of the event which will cover cars from different regions.

Honda Civic Type-R

Thursday, 8 September 2016

Yamaha RD 350 F2 '88 - Part 5 - Rear suspension linkage maintenance

I did some small maintenance jobs while I had my bike dismantled and taken to pieces when I was modifying the rear frame. One of those jobs was to replace worn bushings, collars and seals from the rear suspension linkage with new ones. After cleaning and dismantling the linkage I found one corroded collar (part #: 90387-144H4), one worn bushing (90386-20134) and punch of broken oil seals (93109-20076 & 93109-18020).

Since my RD is quite old I had to purchase replacement collar and bushing from eBay where you can find a nice collection of NOS (New Old Stock) parts for sale. Common parts like oil seals I try to buy from my local store which sells industrial products. Most of the common sized bearings and oil seal are usually in stock so you don't have wait for them. This time I wasn't able to find the right sized oil seals for the linkage arm so I ordered them from my local Yamaha parts dealer. Dimensions for linkage arm oil seals (93109-20076) are 20 x 27 x 5 mm and drop link oil seals (93109-18020) 18 x 24 x 3 mm.

After getting all the right parts it was just a matter of greasing them with multipurpose grease and putting back together.

Parted rear suspension linkage.
NOS collar (90387-144H4) and bushing (90386-20134).
New oil seals for linkage arm (93109-20076)...
... and drop links (93109-18020).
Old versus New (Old Stock).

Monday, 5 September 2016

Yamaha RD 350 F2 '88 - Part 4 - Simple bolt-on mods

One thing that needed changing in my RD was the narrow handlebar it came with. The old handlebar I had on the bike was only 740 mm wide. Fortunately my local motorcycle parts store had a nice low and significantly wider tapered handlebar made by Emgo for sale with a discount. Emgo's are quite a bit cheaper than let's say handlebars made by Renthal or Magura but with a 50 percent discount this one was bargain not to miss.

I had a problem with fitting stock control switches on the new handlebar since they were too wide. Fatbar handlebars tend to have quite narrow control length since they are mostly used on motocross and enduro bikes. I had to buy a pair of slim bar ends and choose a narrow set of grips to make most of the narrow control length and widen it a bit. Fortunately it helped and everything fitted at the end. Luckily stock cables were also long enough and I didn't have to do any mods to them. You can find those slim bar ends from eBay if you have a similar problem. 

I also wanted to replace those old mirrors I had on the bike. Agila makes a nice looking and cheap pair of mirrors which fitted nicely without any adapters.

New fatbar made by Emgo (7075 CR low bend).
Pair of Slim Bar Ends made by Bike It.
Pair of Agila mirrors.
Left side mirror unboxed.
Pair of Domino grips.
New parts installed. Total width 860 mm with slim bar ends.
Closeup.
GoPro Hero with a handlebar mount?

Sunday, 24 July 2016

Yamaha RD 350 F2 '88 - Part 3 - New battery Exide EB5L-B 12V 5Ah

When I bought the bike previous owner of it said that current battery in the it doesn't want keep its charge. While driving you definitely noticed it since headlight on it shined quite dim and indicators kept flashing slowly since they didn't get enough current. After going through one of our local parts dealers web site I found a suitable battery to replace the old one. 

I chose Exide EB5L-B (12V 5Ah) which is 120 mm long, 60 mm wide and 130 mm high. It has only 5 Ah but it is still plenty enough for a bike like my RD 350. In a bike like this battery is mainly used to run lights. Since it doesn't have a electric starter it doesn't really need that beefy battery ether. Since it is a conventional battery you need to fill it with acid before installing it.

DISCLAIMER: If you're not 100 % sure of what you're doing don't attempt anything you're not trained to do. Battery acid is a extremely dangerous substance and should not be handled without care. Remember to use proper safety equipment and get acquainted with all the info and instructions provided by the battery manufacturer before attempting anything.

Here's everything what package contains:
battery, acid bottle, overflow hose, bolts and nuts for terminals,
funnels for acid filling and instructions.

Instructions for acid filling on the side of the acid bottle.

First step was to remove red vent caps.

Next step was to install funnels. I also removed red exhaust cap
and added overflow hose.

I removed plastic film around the acid bottle and
pushed it upside down against the funnels.
Remember to leave seals to the acid bottle before filling.
Funnels will puncture them when you push the acid bottle against them.

Lastly I installed back the red vent caps and
added bolts and nuts to positive and negative terminals.
Battery is now ready to be installed.

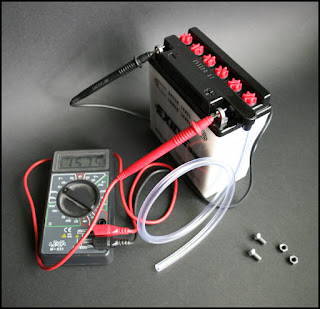
But before installing it I wanted to test
what kind of voltage I get from it after filling. 

Voltage kept rising quite high.

New battery in place and ready to be tested.

Monday, 11 July 2016

Yamaha RD 350 F2 '88 - Part 2 - Back to stock seat and side panels

After driving a bit over 300 kilometers with my 88' RD 350 F2 I felt I needed to do something to the seating position of the bike. Rear frame of the bike had been modded a bit by the previous owner to get the seating position as low as possible. Fuel tank and seat had also been moved a bit forward. He had changed the angle of the rear frame, upper frame tubes, seat and fuel tank mounts. 

After thinking about it for a while I decided go with the OEM look and buy some stock second hand parts to replace the old and modded parts. List of parts included an air box, inner rear fender, left and right side panels and a seat. Fortunately I managed find some decent/good conditioned parts which matched the color scheme of my bike. Unfortunately I didn't take as much pictures as usual when I fitted all of the parts and unmodified the rear frame but here's few of the end result.


Saturday, 14 May 2016

American Car Show Oulu May 2016

Went to see some show cars with my friends last weekend. Here's a small collage of pictures from the show. I used a loaned pocket camera so image quality isn't the greatest. American Car Show is an annual event in Oulu and put together by American Car Club Oulu which was established in September 17 1979.

You can find out more of the show from their Facebook page and website (in Finnish):

https://www.facebook.com/americancarshowoulu/

http://accoulu.fi/