Sunday, 31 May 2020

'73 Suzuki GT250 - Part 13 - MX footpegs and custom brackets

I had a pair of IMS Pro Series footpegs meant for Kawasaki '99-01 KX125 250 (#293112-4) laying around which I had purchased for a previous project of mine but never ended up using them. After getting rid of that bike I stored them for later use. At one point I had them for sale too but after time went by and I still had them I decided to utilize them in this build. 

I designed a pair of brackets to be able to fit them to frame of my GT250K with help of four weldable inserts and M8 bolts. Inserts were turned in lathe out of 18 mm round steel bar and parts of brackets cut out of 6 mm steel sheet using water jet cutter and welded together.

Footpeg assembly

Pair of IMS Pro Series footpegs
for '99-01 Kawasaki KX125/250 (#293112-4)

Pair of pins, 10x49.5 (#92043-1564)
and springs, step (#92144-1951)

Dimension drawing of M8 frame inserts

Inserts were turned in a lathe out of 18 mm steel round bar

Dimension drawing for parts of footpeg brackets

Preview of cut drawing for parts of footpeg brackets

NC-code for water jet cutting

Water jet cutter


Exterior...

...and interior of sand blasting cabinet

Blank after sand blasting

Pieces separated with a hand saw
Since water jet cutter tends to leave chamfers to holes I decided to make them bit smaller and drill them to right size after cutting. I did that in two stages. First time to 8 mm and after mocking up and welding M8 inserts to frame to 9 mm. 8 mm holes allowed me to center inserts perfectly to brackets. They would have been too tight for M8 bolts after painting so I decided to drill them afterwards to 1 mm oversize. I will powder coat both footpegs and brackets later once I have all the other parts such as side stand etc. ready for that as well.

Centering pedestal drilling machine with a countersink drill bit

Drilling with 8 mm...

...and 10 mm drill bits

Finishing with deburring tool

Chamfers done with belt sander


Securing parts together with a welding magnet

Outer corner tacked

Bracket fixed to a vice

Final bead

Footpeg fitted to bracket to help welding of the other side...

...and fixed to a vice

Both corners tacked...

...and welded after removing footpeg


Tools for drilling holes to frame for M8 inserts

Positions of right side holes marked...

...and drilled

Inserts positioned using bracket,
pieces of wooden planks and two clamps

Tacked in place...

...and fully welded

Right side footpeg assembly mocked up

Both footpegs in place

Cleaning areas near weld bead with Dremel

Drilling holes to 9 mm

Deburring

Footpeg brackets...

...and footpegs sand blasted and ready for powder coating later

Saturday, 30 May 2020

Race bikes @ MP 20 - 1st of February 2020 - Helsinki, Finland

Here's rest of photos I shot at MP20 motorcycle expo. Check out also my other MP20 photos showcasing Petrol Circus Custom Bike Show 😎

Ice One Racing Husqvarna FC 450 #7 Kimi Räikkönen

Saturday, 18 April 2020

American Car Show 2019 - 11th of May - Oulu, Finland - Part 3/4 - Motorcycles

Throwback to last year's American Car Show held in Oulu during mother's day weekend. Here's a set of photos of cool motorcycles displayed at the show. Take a look 😊

1950 Harley-Davidson Panshovel

Sunday, 5 April 2020

Classic Motorshow 2019 - 4th of May - Hobbyist car park

Here's a set of photos I took last May from hobbyist car park of Classic Motorshow. I made a very short trip to Lahti that Saturday and unfortunately didn't have time to visit the show itself. Luckily weather was very nice and there were a lot to see outside. Take a look 😊

Ford Mustang Boss 302

Tuesday, 3 March 2020

'73 Suzuki GT250 - Part 12 - Mock-up engine

Some time ago I bought a cheap Suzuki GT250 parts bike from an online auction site. Bike itself was in pretty bad condition but I taught I could utilize at least some parts from it. Lots of parts were missing but frame had still front forks, swingarm, fuel tank and engine attached to it. Few extra pieces, like Honda CB125 exhaust pipes, which I sold, were included to the deal as well. After disassembling parts from the frame I turned my attention to the engine. It wasn't a big surprise that it had seized pistons and plenty of rust after sitting outside and water getting in. After taking the engine a part I decided to clean it up a bit and utilize it as a mock-up engine for building exhaust pipes et cetera while I put together actual engine for this bike.

Suzuki GT250 engine out of a spare parts bike


I decided to use soda to clean upper and lower crankcase. Good thing about soda blasting is that it isn't abrasive like sand blasting so it doesn't require as much prep work since you don't have to mask as many spots. Bad thing about it is that it's rather corrosive if parts are not cleaned well afterwards.

Before blasting I used a brush and some solvent like brake cleaner to remove excess dirt and grease which would have just ended up disturbing soda blasting process. Below you can see few closeups of lower crankcase before and after soda blasting. I soaked them in warm water after blasting to get leftover soda out of them. Otherwise it would have ended up corroding the surface.

Lower crankcase before soda blasting


Soda blasting equipment: 
gun, water separator for air compressor and soda


I put both crankcases to a big bucket with warm water
after soda blasting to dissolve leftover soda out of them

Lower crankcase after soda blasting


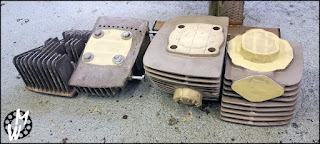
For cleaning cylinders and cylinder heads I decided to use sand blasting. Before doing so I took rubber pieces out between cylinder head fins, removed excess dirt with a brush and some degreaser and masked surfaces which I didn't want to get blasted. I did this at my university's workshop where they have a sand blasting cabinet. I will show it in a post coming up later.

Cylinders and heads prepped for sand blasting

Closeup of sand blasted cylinders and heads
Last step was to bolt covers back on the crankcase which I bought separately. I used socket cap screws for nice aesthetic which I had in stock. I didn't see it necessary to clean up covers yet in this phase since they looked to be in OK condition.

Pieces of mock-up engine


Crankcase covers

Various M6 & M8 socket cap screws

Mock-up engine ready


I will take this engine apart and fit in necessary axles when I will start to figure out how to fabricate brake and gear levers. But before that I need footpegs which are next on my list of things to finish. If you look close at one of pics below you might find an easter egg related to them 😎

Wednesday, 19 February 2020

The Kustom Kulture Show 2020 @ Cable Factory - 9th of February - Helsinki, Finland

This year's Kustom Kulture Show once again displayed lots of cool kustom cars and motorcycles. In addition there were various type of artists and craftsmen such as painters and tattoo artists. Event kicked off on Saturday which ended to a party with bands playing live music and performances such as Burleski and sword dancing. I made my visit during Sunday morning knowing it would be a squeeze to fit in later and hoping there would be more space for photographing. Check out how the event looked 😎

1952 Buick @mast_auto

Sunday, 2 February 2020

Petrol Circus Custom Bike Show @ MP 20 Motorcycle Expo - 1st of February 2020 - Helsinki, Finland

Check out photos from this year's Petrol Circus Custom Bike Show which was held parallel with MP20 motorcycle show at Expo and Convention Center of Helsinki. Show gathered together around 100 custom motorcycles to compete in four classes: Custom, Street, Classic and Open. 

My personal favourites were Kawasaki powered Sulo Chopper, Kalevala themed Harley-Davidson PanShovel Indian Larry Tribute, brat style/tracker Honda CB400N, 1980 Suzuki GSX750 cafe racer, Suzuki GSX-R 1340 street fighter, 2-stroke Suzuki RGV250 and 184cc Honda Monkey Turbo 😎

Royal Chopper 'Prince of India' @woodlegchoppers